Ruling Pen Basics
By Matthew Coffin. Traditionally, drafting ruling pens have been used to rule lines of fixed thicknesses on mechanical drawings or illustrations. In the second half of the 20th century, lettering artists – exploring ways to create expressive lettering – learned these same pens could also be used for calligraphy. By tilting a ruling pen on its side, dramatic and rough-edged strokes could be created. However, these pens didn’t hold ink well when used at such unusual angles, and they needed to be redesigned for calligraphic purposes. The shape of the ruling pen changed dramatically, taking the form that we find today. German calligrapher Gottfried Pott was instrumental in this transformation.
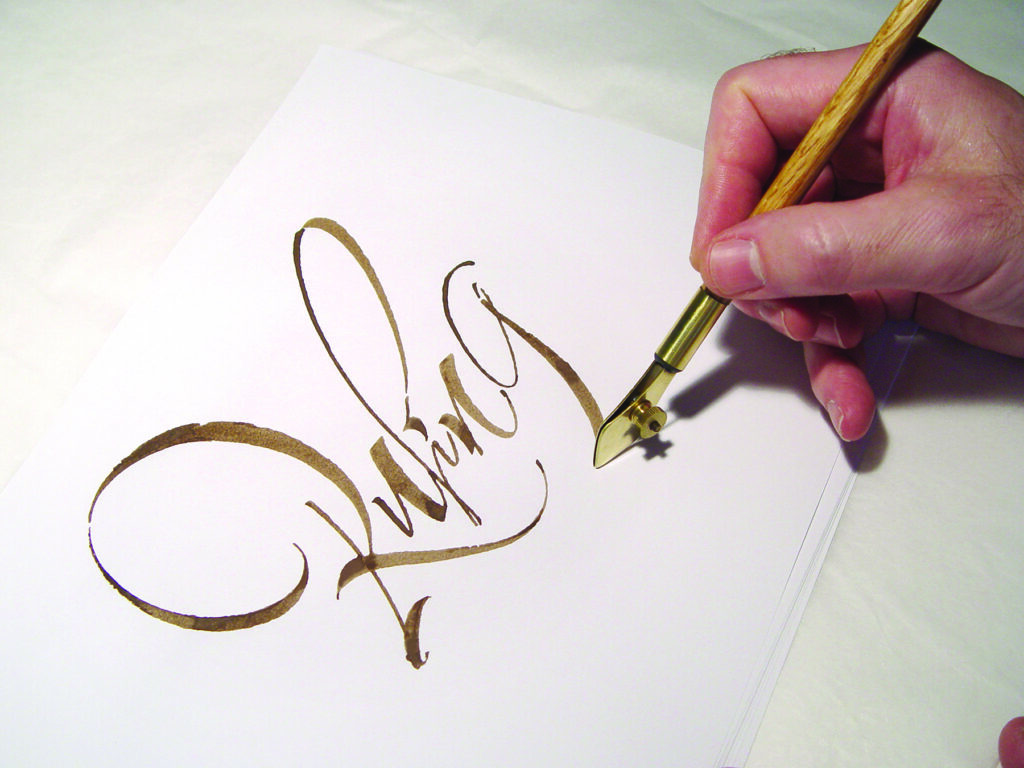
Calligraphic ruling pens create thin strokes with the pointed tip of the nib and create thick strokes when one writes with the wide edge. Varying the tilt of the ruling pen while writing creates varied line widths; how the pen is held determines how easily the artist is able to tilt it. No matter how the pen is held, it is important to always allow the fingers, hand, and arm muscles to remain relaxed.
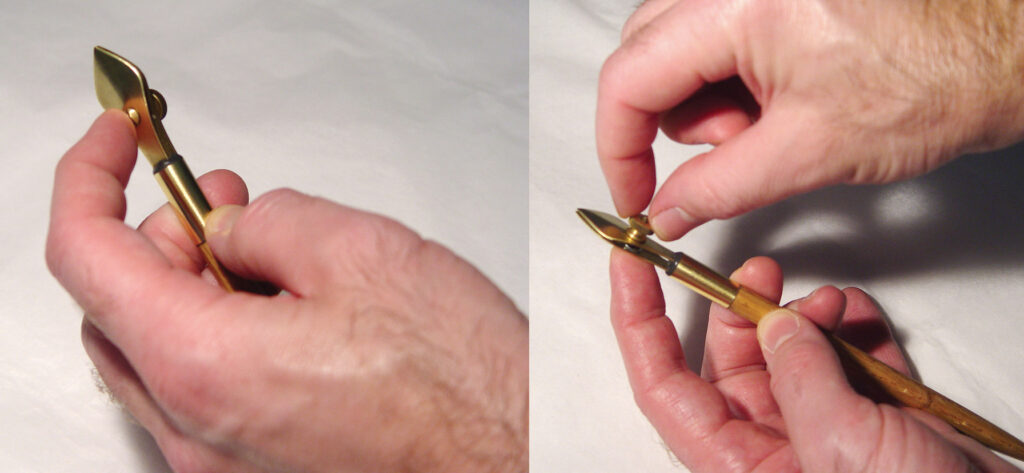
Adjusting your ruling pen blade gap. Left: the proper hand position. Right: rotate clockwise to close; rotate counterclockwise to open.
Adjusting the ruling pen
Hold the pen gently between thumb and fingers. With your index finger, press firmly against the head of the machine screw (on the bottom of the pen). While looking at the writing edge of the nib, grasp the knurled adjustment nut with the fingers of your other hand and turn it clockwise to close the gap, or counterclockwise (anticlockwise) to open it. For thin inks, the gap should be almost closed; for thick, viscous inks, the gap should be much more open. You’ll learn the proper adjustment for each type of writing fluid with practice and experimentation.
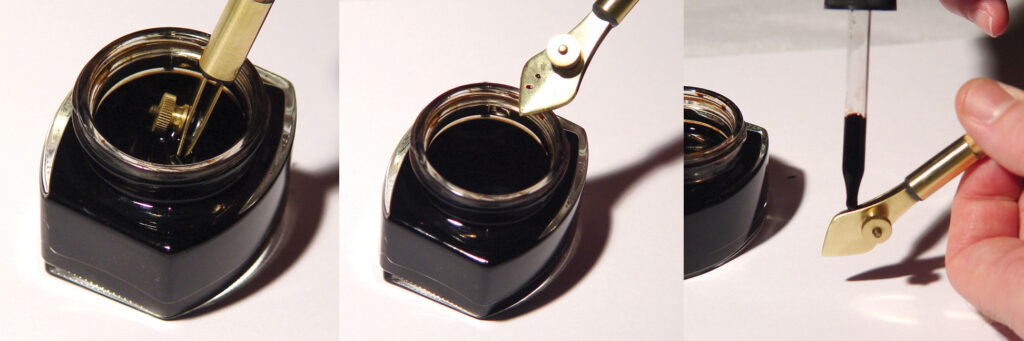
Two ways to fill your ruling pen: dip (left) and wipe (middle), or fill with an eyedropper (right).
Filling the reservoir of your ruling pen
There are two simple ways to fill the pen: dipping the pen or filling it with an eyedropper or syringe.
Dipping requires an inkwell with a mouth wide enough to accommodate the nib and adjustment nut and deep enough to allow for the nib to be submerged almost to the adjustment nut. To fill your pen, hold the pen vertically and slowly dip the nib into the inkwell, allowing the ink to flow into the space between the blades (the reservoir). Don’t dip too deeply: you want to keep ink away from the adjustment nut. Remove the nib, then gently wipe excess ink from the top and bottom surfaces with a cloth (or the lip of the inkwell). Don’t touch the writing edges when wiping, as ink will wick out of the reservoir and be wasted.
Using an eyedropper or syringe to fill your ruling pen can keep ink from getting on the outer surfaces of the nib, but this technique requires extra equipment and cleanup. Hold the pen with the nib pointed downward and slowly squeeze ink into the reservoir until the ink becomes visible. Avoid overfilling: adding too much ink will cause it to spill from the reservoir, messing the top and bottom surfaces of the nib. (With filling by eyedropper, it is possible to achieve one-off multicolor results. Use separate eyedroppers to load the pen with two or more colors of ink. The results will vary depending on the type of ink and the colors used; experiment and see what happens.)
Left: Holding the pen with the barrel above the palm of the hand.
Right: Holding the ruling pen with the barrel below the palm of the hand.
Holding your ruling pen
There are two ways you can hold the ruling pen. You can hold the pen in the same way you hold a pencil or regular dip pen, with the ruling pen handle protruding above your hand. With this hold, the pad of the hand and side of the small finger should rest on the writing surface, giving support and stability. You will need to use a guard sheet to protect the paper from hand oils.
You can also hold a ruling pen with your hand above the pen. With this hold, no part of the hand rests on the paper surface as you write, and hand oils won’t come in contact with the writing surface. This technique lets the hand move more freely, but control may be sacri-ficed. (If you want to create tightly curved lines, this position can work against you.) Try both holds to see what works best for you.
You may want to experiment and practice long enough to get comfortable with both positions. Doing so will allow you to develop both sets of skills and prepare you for a variety of applications.
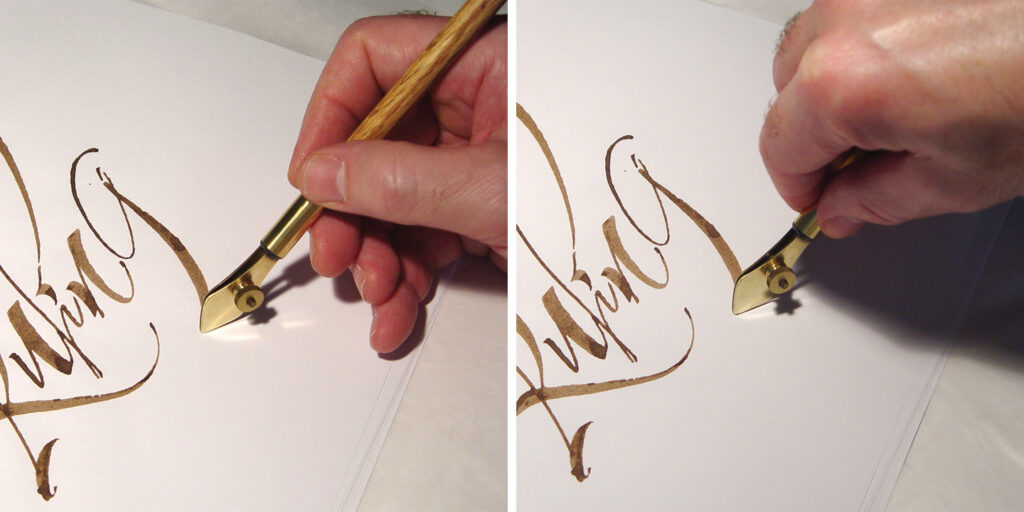
Writing with your ruling pen
Before starting to write, place multiple sheets of paper (or other padding) under your writing surface. The “give” created by the padding allows the writing surface to curve up to meet the full width of the ruling pen nib. Without extra padding, you may find the maximum line width you create remains fairly narrow. Remember that thin strokes are created with the nib pointed downward, writing with the apex of the nib. Thick (wide) strokes are made with the pen held low to the page, using the curved wide edge. Varying the angle of the nib to paper while you write will allow you to vary line widths. If you find your hand or fingers restrict the tilt of the ruling pen, move your hold farther from the nib.
Always endeavor to stay relaxed, since easy, flowing movement is the hallmark of ruling pen writing. As you practice, don’t forget to play. Play will allow you to experiment and try new things and learn new techniques, which will help you to create a variety of letterforms and textural lines. Once you’ve become comfortable with a pen-ink-paper combination, try your hand at different letterforms. The ruling pen is versatile and can mimic pointed-brush, flat-brush, pointed-pen, or chisel-edge letterforms.
Remember that the more you practice with good technique, the sooner you’ll see positive results – true with any writing tool.

Top: traditional draftsman’s Ruling pen.
Bottom: Pen Artisan calligraphic Ruling pen.
Cleaning your ruling pen
It is always advisable to keep the nib of your ruling pen clean. Avoid allowing waterproof inks to dry in the nib – they may leave permanent deposits that block ink flow. Like dip pens, ruling pens can benefit from being rinsed out during use, especially when waterproof and water-resistant inks are used.
After use, ruling pens are easy to clean, since the machine screw and adjustment nut can be removed, allowing greater access to the reservoir. A brush and warm water mixed with small amounts of ammonia or dishwashing liquid will let you thoroughly clean the entire nib (a soft toothbrush works well).
With non-waterproof, water-soluble inks, such as Pelikan 4001, you need only drain the ruling pen reservoir on a paper towel, then dab the outer surfaces dry. These kinds of inks will rehydrate easily even after they have been dry for weeks. Small residues of such inks won’t cause flow problems. In fact, you may find leaving thin residues of such non-waterproof inks on the writing edges helpful in getting flow to start the next time you use the pen. This practice won’t work well if you switch colors – unless you don’t mind mixed colors!
Storing your ruling pen
Store your ruling pen so the metal nib won’t contact hard or abrasive surfaces, which could scratch or dent the brass. Before storing, dry your pen. A closed plastic tube (like a Pen Artisan ruling pen is packaged in) is ideal for storage, but if you store your ruling pen wrapped in paper or in a cardboard box, you won’t need to be so careful about drying it completely after cleaning. (Even though the natural wood handle of Pen Artisan ruling pens are protected with linseed oil and a polyurethane finish, they will last longer when kept clean and dry.) When storing multiple pens together, wrap the pens individually to avoid impact and possible damage. Keep your ruling pen in good condition and practice with it often to take advantage of its amazing versatility!
Matthew Coffin’s lifelong interest in calligraphy and lettering began in 1973, during a junior high school calligraphy course in Albany, Oregon. In the early 1980s, while at Oregon State University , he studied with Alan Wong, who furthered his understanding and interest in letterforms. After an unsuccessful search for a writing tool for a project in 1992, he made his first pen. He later shared additional pens with fellow scribes, and the positive response to those prototypes lead him to open business as The Pen Artisan in 1993.


